Planes of the Figure Drawing
Objects look convincing when a draftsman models the form correctly. Here, we take information technology pace by step to ensure accuracy and a solid foundation.
past Jon deMartin
Every creative person wants to master the modeling of class, using value to create a 3rd dimension in a drawing, so permit's take a look at this key job. Information technology's a large subject, so we'll tackle unproblematic concepts commencement. Let's brainstorm with modeling the most basic geometric solid—the cube. The cube's planar surfaces are easy to draw and model considering they're articulate and unambiguous—cubes don't have confusing surface irregularities or changes of local color or texture. Nature'due south surfaces are generally curved, but manmade objects are oft flat, as in walls, tabletops, and buildings. Plus, lite and shadow are more discernible on a cube than on a curved surface.
Noted teacher and illustrator Frank Reilly once stated, "What y'all will acquire on a simple form like a cube or sphere can be practical to a caput, figure, or landscape. Information technology will aid yous see the three-dimensional reasoning of nature. It will help you lot depict from memory and your purely artistic attempts. Values relative to light and shade must be understood equally a mirroring of nature before they tin exist seen as a personal caption of nature. They must be clearly understood, get-go and last, by the observer."
Information technology'southward advisable to exercise making flat values before graded ones. A flat-value mass is produced past cartoon even strokes parallel and touching ane another to create a flat and even mass. Dark values are fabricated by increasing pressure level, and light values by decreasing pressure. Practice non smudge graphite—shaded areas that are smudged take a shiny appearance. Try to avert haphazard and uneven pressure on successive strokes when creating a graded surface area.
 |
| Analogy 1 |
Illustration 1 shows three swatches of value—light, middle, and dark tones. Try to reproduce these apartment values, then motility on to tackle a value scale. Analogy 2 shows a value scale divided into vii gradations between blackness and white. The objective is to create a scale from the darkest dark upwards to the white of the paper and brand the gradations as even as possible. Lightly pencil in nine equidistant spaces an inch apart, and number them underneath from left to right. Value No. ane is blackness, on the far left, with values lightening upward to No. 9, the white of the paper. The value scale in this illustration was made with a soft pencil for the darker values, a medium pencil for the middle values, and a hard pencil for the light values. There are several ways of determining if the values are graded evenly. The values should graduate smoothly without obvious jumps. The contrast at edges should appear the aforementioned throughout the scale. When in dubiety, isolate any 3 sequent values and make certain the value in the middle is not leaning more to 1 adjacent value or the other. Go on in listen that the artist's value calibration is much narrower than what ane sees in nature, because the white of the newspaper is nowhere near as bright as the dominicus, nor is black pencil every bit nighttime equally the inside of a black velvet box.
 |
| Analogy 2 |
Before shading, a draftsman must be sure that the object's outlines are drawn correctly and that the linear perspective in the composition is authentic. Once you solve the proportion of the object'southward shape and its shadow shapes in relation to the lights, y'all can costless your mind to focus on the modeling (shading).
To practice, I recommend getting a white or light-gray cube with polish surfaces, no smaller than three or four inches high. Illuminate the cube using a single calorie-free source, natural or bogus, from to a higher place left with ane side of the cube completely in shadow. The footing underneath the cube should be neutral middle to dark gray and should not have a shiny surface. Ideally, a neutral heart-gray groundwork tin can be placed at a relatively short distance behind the object.
Side by side, set an outline of the contour lines and the edges of the major planes. Keep your lines as lite as possible so that they don't interfere with the values you lot'll be modeling. If they are as well night, lighten the lines with a kneaded eraser until they are just a guide for the areas to exist shaded. After cartoon the outline that premises the form'south shape, draw the shadow line that divides the overall light from the overall shadow. First mass in the shadow with a value lighter than what you see on the cube—this initial stage is merely a preparatory phase for modeling, and your light touch enables you lot to make corrections earlier pushing the drawing toward finish.
By using your value scale to aid make up one's mind the relationship of your lightest light to the darkest dark, y'all can relate all your values in between. Never take for granted that the values you observe in nature volition fall into one of the squares on your value scale. The value scale is designed just to requite you a reference point then that yous tin brand improve value comparisons. While drawing, continually compare your values in the low-cal to your shadows. Put in your shadows first, and gradually build up the values in flat areas equally the drawing develops.
 |
| Illustration three |
You may observe that the portion of the shadow plane that is nearest the light volition wait darker than the other areas of the aforementioned shadow. This is called the police force of contrast in Michel Eugène Chevreul'due south 19th-century book The Principles of Harmony and Contrast of Colour and Their Applications to the Arts. He wrote, "The shadows on objects are stronger nearest the eye, and they decrease in force and intensity in proportion to their distance." This is the start rule of aerial perspective, which can apply to a local condition as well. This tin can exist observed on the illustration of the value scale where the darkest role of each value appears to be at the edge where it meets the lighter value. In other words, the contrast looks greater where the edges meet.
 |
| Illustration 4 |
Practise drawing cubes in different perspectives under the same light status to explore how the changes of planes dramatically affect the values. Illustrations 3, 4, and 5 show 6 rows of cubes, rendered in both line and value, from unlike vantage points. The cubes on the left are drawn with but lines but read volumetrically because they reveal the interior plane line divisions. The cubes on the right read volumetrically because of their value relationships. Think, in modeling form, plane and value are synonymous (or interrelated). The first row of Illustration three shows simply one airplane and value because the eye is looking directly at the cube's center. In the second row, the heart is looking from above, showing two planes: top and forepart.
 |
| Illustration 5 |
In Illustration 4 the outset row shows two planes coming together at the corners. The second row is the reverse of the 2nd row in Illustration iii; the center is now looking from below, showing 2 planes: bottom and front. Analogy five shows three planes: superlative, front, and side correct. The cube in the bottom row is tipped, tilted, and turned, vanishing to a simulated horizon. This is the about challenging of all views, and it's similar to what a draftsman faces when depicting a homo caput. All the other cubes in these illustrations are vanishing to a true horizon. The schematic in Analogy 6 shows the different plane changes.
 |
| Illustration 7 |
The ability to place planes is crucial to modeling form. The figures of the Cube Man in Illustrations 7, viii, and 9 conspicuously evidence how plane changes impact values. In Illustration 7, the front view, the rectangular cake that is the ribcage is light considering it's a top plane, and the pelvis is darker because it's an under plane. To reinforce this concept of plane directions, the artist should detect the pose from different views. For instance, Illustration 8 shows the side view drawn in line and clearly indicates the planes' directions. Notice that in the back view in Illustration 9, the ribcage is darker because it's going nether, and the pelvis is lighter because it's a peak plane—the reverse of the front view in Illustration 7.
 |  |
| Analogy viii | Illustration 9 |
Upwardly to this point we've been talking about values that run summit to lesser. In the front view in Illustration seven, you can also encounter airplane changes running from side to side. The front plane of the correct thigh is facing the viewer, and the left is rotated outward, condign a side-right plane. Notice how planes that become to the side darken. (See Illustration 6.)
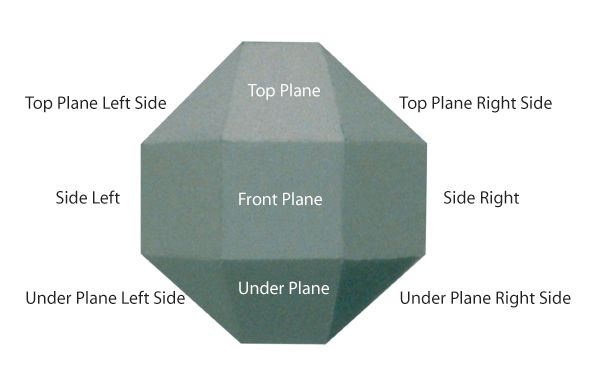 |
| Illustration six |
Drawing simple objects enables an artist to master the basics. By taking baby steps toward what nature shows us, we can build on a certain and solid foundation that will help u.s. go better artists, allowing united states to express our visions of the visual world.
Materials For Modeling With Values
A graphite pencil is the simplest, most direct, and nigh valuable of all art tools. It's an excellent tool for both drawing lines and filling in shaded areas. It'due south basically a line medium rather than a broad area or planar medium, and it can be used sketchily or more carefully. All the same, if a graphite pencil is used as well heavily it volition produce a shiny appearance in i's artwork, and it will be susceptible to smudging. Hard pencils tend to break if pressed besides heavily in an effort to produce a dark line. Night lines and shadings instead should be drawn with soft pencils, which do non crave great pressure. Use a precipitous pencil point. In terms of surface, effectively-grained newspaper lends itself meliorate to graphite; crude papers produce a coarse, grainy wait.
For sharpening pencils I prefer a single-edge razor blade, which I use to shave away the woods around the pencil bespeak. I slowly rotate the pencil between my fingers using long shaving strokes so that my pencil has a long, sharp bespeak. This manner my lines can exist crisp and last a long time before I have to resharpen.
Charcoal or carbon pencils tin can be preferable to graphite pencils considering they don't go out a sheen, and they tin produce darker darks than graphite. The drawback is that they're less controllable, but this can be overcome with practice.
A kneaded eraser is maybe the best eraser to use when working with graphite or charcoal. It tin can be shaped to a betoken to accomplish small areas without affecting the rest of the drawing, and it volition remove pencil marks without marring the surface of the paper.
Source: https://www.artistsnetwork.com/art-techniques/drawing-fundamentals-modeling-planes/
0 Response to "Planes of the Figure Drawing"
ارسال یک نظر